How to Fix LED TV with a strip of Christmas Lights
Here is a quick guide to how a set of Christmas ligths was used
to save a broken LED TV for cheap.
** Please see bottom of page for Addendum **
Seiki LED TV SE322FS 2012 No video,Sound Good
Doing a extensive web search, I found a thread about this model...OEM LED strips are NLA , or NA, bummer.
Sure, the bad LED could be tracked down, and replaced, or jumped, but knowing how things go, another one is about to burn out sooner or later.
I was driving the TV back to the customer, and had a brainstorm. XMAS LEDs!!I headed to the local Ace Hardware store.
Parts:
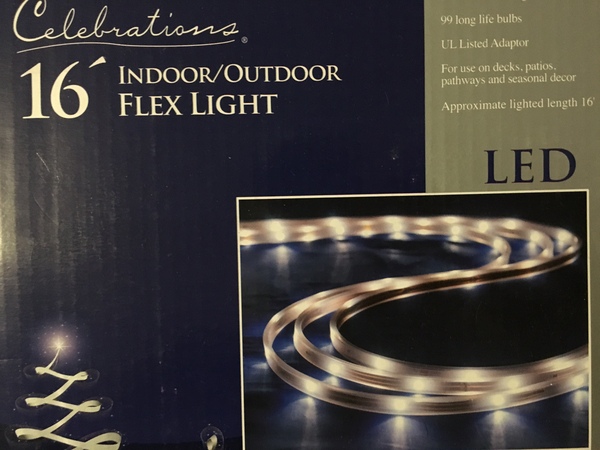
Celebrations 16' Cool White SMD LED strip cost $12.71
3M #27 glass electrical tape, or perhaps hot glue, avoid black tape, it'll probalby lower the light output.Other possibilties might be white surgical tape
6' of thin gauge wire, about the same as the LED strip
2 wires of different colors, Red and Black is a good choice, not to thick, not to thin, about 2 feet or so
Tools
Voltmeter
wire stipper
25w solder iron
razor blade/ exacto knife/ barber scissors
Philips screwdriver[goes a lot faster with electric drill]
 Lay TV on table,screen down
remove base and back panel, keyboard is mounted on back panel,remove it and plug back in so you can turn set on.
locate thin red and white power wires to LED array,pull connector. It has 3 pins, middle pin is NC.
Turn on, test for ~60VDC.
If you get no voltage, your problem is somewhere in the p/s , and not covered in this fix.
Unplug power cord
Take coffee break, and to be on safe side, verify the the large capacitor[150VDC] is discharged.
Unplug speaker and remote board....don't forget to reattach, I'll remind you, I almost did but caught it before replacing back cover.
There's 2 screws at the bottom of panel, remove.
At top of panel, there's 2 large plastic hooks, bend up,
and remove entire panel.
The main board can be left on throught out fixing.
Flip panel over.
Remove all the screws around perimeter, and lift metal frame away.
Lay TV on table,screen down
remove base and back panel, keyboard is mounted on back panel,remove it and plug back in so you can turn set on.
locate thin red and white power wires to LED array,pull connector. It has 3 pins, middle pin is NC.
Turn on, test for ~60VDC.
If you get no voltage, your problem is somewhere in the p/s , and not covered in this fix.
Unplug power cord
Take coffee break, and to be on safe side, verify the the large capacitor[150VDC] is discharged.
Unplug speaker and remote board....don't forget to reattach, I'll remind you, I almost did but caught it before replacing back cover.
There's 2 screws at the bottom of panel, remove.
At top of panel, there's 2 large plastic hooks, bend up,
and remove entire panel.
The main board can be left on throught out fixing.
Flip panel over.
Remove all the screws around perimeter, and lift metal frame away.
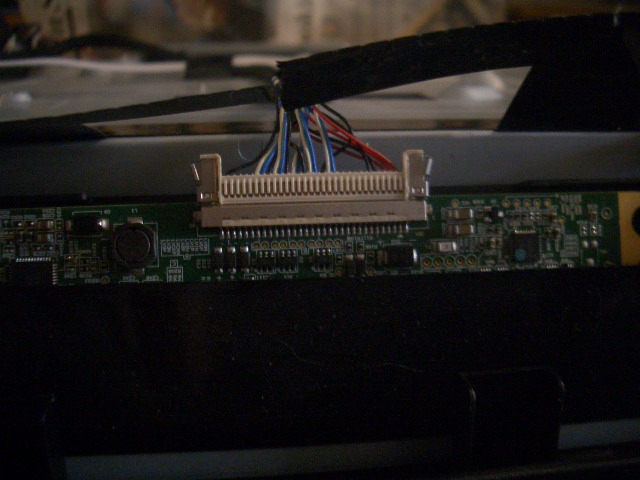 At the top of panel, a plastic sheet covers the T-Con board. Cut this open. The T-Con board is free floating in there.
Holding the board, squeeze both of the metal locking clips at each end, and wiggle connector off.
Extreme care must be exercised so as not to tear the thin film wire going into LCD panel.
Remove lcd glass, set on top of box, out of the way
there are 2 more screws holding down the black plastic frame, remove them.
Under the LCD, there are 2 more white panels.
At the top of panel, a plastic sheet covers the T-Con board. Cut this open. The T-Con board is free floating in there.
Holding the board, squeeze both of the metal locking clips at each end, and wiggle connector off.
Extreme care must be exercised so as not to tear the thin film wire going into LCD panel.
Remove lcd glass, set on top of box, out of the way
there are 2 more screws holding down the black plastic frame, remove them.
Under the LCD, there are 2 more white panels.
Now for the fun:
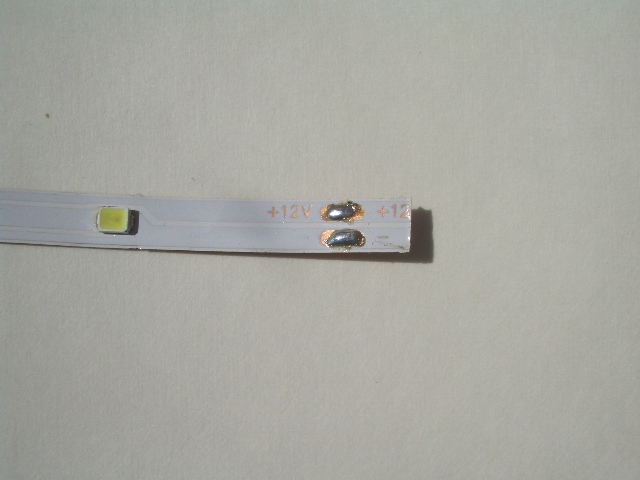
I was blessed with a LED tape whose sections worked out just right to cut and lay in the "field" area.
The tape must be cut at the places along it where there's 2 copper foils. The LEDs are powered 3 at time, with one dropping resistor.
Snip off the extension connector, close to the last LED.
Lay tape in field, cut at other end.
Repeat 6 times.
Next, I removed the waterproof covering, by running the barber scissors down the back side.
Optionally, you could leave it on , and just cut a small area at the end to be soldered.
Measure the width of field , DIVIDE this by 5, mark off at both ends.
Pretin the ends of each tape
 Cut the valleys at the power end to give enough access to unclip the 3 connectors for old LEDS. There're daisy chained.
Cut or peel off the tape that's tacking down the Red and White , so it can be pulled slightly into the screen area
Starting at far end, set LED tape down on mark, and press first adhesive tape firmly into white sheet, then
stretch out LED tape, and just place adhesive tape every few inches. After a few , I realised the full width of glass tape was overkill, so I cut down the center.
Repeat 6 times
Altough I could have ran 2 wires from end to end, I chose this method of wiring them all up:
Cut the valleys at the power end to give enough access to unclip the 3 connectors for old LEDS. There're daisy chained.
Cut or peel off the tape that's tacking down the Red and White , so it can be pulled slightly into the screen area
Starting at far end, set LED tape down on mark, and press first adhesive tape firmly into white sheet, then
stretch out LED tape, and just place adhesive tape every few inches. After a few , I realised the full width of glass tape was overkill, so I cut down the center.
Repeat 6 times
Altough I could have ran 2 wires from end to end, I chose this method of wiring them all up:
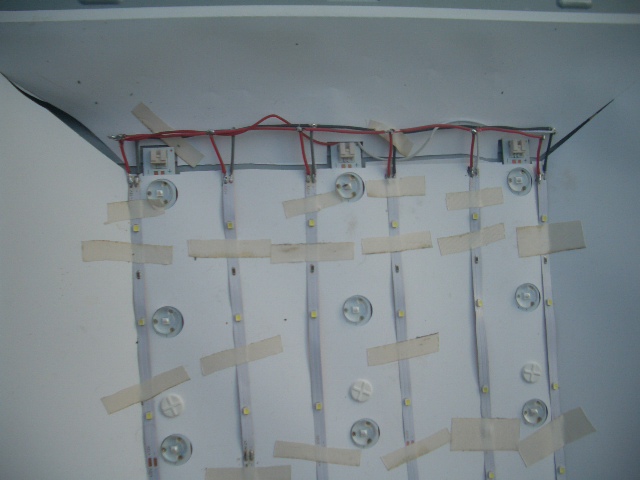 Treating like a battery bank I wired the +Red and -White at the opposite ends, to cancel any voltage drop.
I'd advise testing entire array before replacing LCD.
Treating like a battery bank I wired the +Red and -White at the opposite ends, to cancel any voltage drop.
I'd advise testing entire array before replacing LCD.
 Cut a small hole in the back panel to feed the red/white wires.tie a loop in to give strain relief.
If all is working, reverse the process to replace LCD
After placing screen unit into front bezel, reattach speaker,remote conectors and keyboard!
Add an extension for the power wires, long enough to make it to your outlet. Solder and tape.
Watch TV !!
I figure after xmas is over, these led stips will be on sale.
Cut a small hole in the back panel to feed the red/white wires.tie a loop in to give strain relief.
If all is working, reverse the process to replace LCD
After placing screen unit into front bezel, reattach speaker,remote conectors and keyboard!
Add an extension for the power wires, long enough to make it to your outlet. Solder and tape.
Watch TV !!
I figure after xmas is over, these led stips will be on sale.
Project Afterthoughts -If you're good at origami,and bad at soldering , it might be possible to fold the LED tape around and around by folding double 90 degree bends at the right places, NO soldering required! -If your doing the soldering method, it might be better to power the array from the middle, making the center area the brightest -stagger the LEDS in a triangular arrangement to maximize overall brightness -use only white wires on power buss . if they don't light up, reverse the wires -this is above my paygrade: it might be possible to power the Xmas lights thru the existing PSU, if you can figure the right number of LEDS, running them in parallel strings to match voltage/current